Dahua: Add NVR to DMSS app

Dec 08, 2025
 637
637
Step-by-Step Instructions for Adding an NVR to the DMSS App on Your Phone
Step 1: Download the DMSS App
- Go to the App Store (iPhone) or Google Play Store (Android).
- Search for “DMSS” and download the app to your phone.
Step 2: Access Settings on Your NVR (If you have the SN/serial number, skip to Step 3)
- Login to Your NVR:
- Using a connected monitor or computer, log in to your NVR (your camera recorder).
- Enter your admin credentials (e.g., admin / password1234).
- Go to Network Settings:
- After logging in, navigate to the Settings page.
- Look for Network settings.
- Find the P2P Option:
- Inside the Network section, find P2P (Peer-to-Peer) settings.
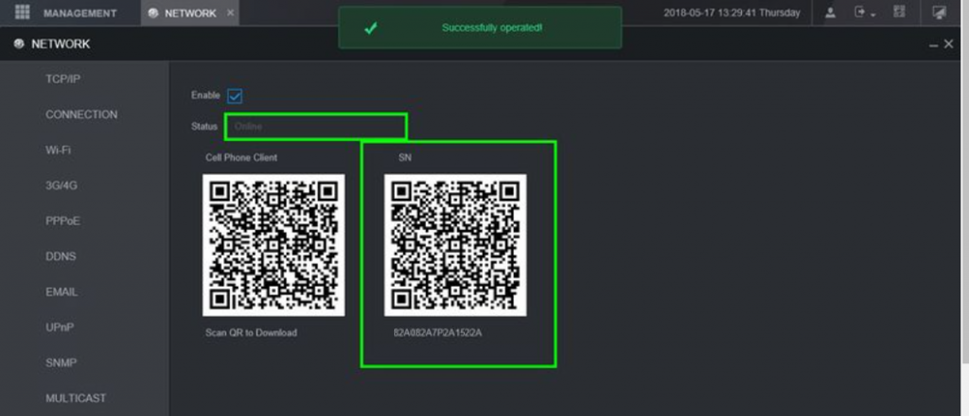
- You should see a QR code displayed along with your device’s SN/serial number.
Step 3: Set Up DMSS on Your Phone
- Open the DMSS App:
- Launch the DMSS app on your phone.
- You don't have to create and account you can close the menu.
- Go to the Home Tab:
- At the bottom of the screen, tap on the Home tab.
- Add a New Device:
- In the top-right corner, tap the “+” icon to add a new device.
- Select SCAN QR Code when prompted.
- Select the Scan QR Code:
- Using your phone’s camera, scan the QR code displayed on your NVR’s screen.
- Add the bottom of the screen select the Manually Enter SN button
- Enter the device SN/Serial Number and press the next button.
- Select NVR:
- After scanning, choose NVR/XVR from the options on the left then choose NVR.
- Enter Your NVR Login Credentials:
- Enter the NVR’s username and password (e.g., admin/password1234).
- Assign a Device Name:
- Give your NVR a name you’ll easily recognize (this is just a nickname for identification).
- Save the Settings:
- Save the settings.
- Press OK to start live view:
- You should now see your cameras from your phone.

